 Photo courtesy of Wattle & Daub Contractors, Bellvue, Colo.
 Photo courtesy of Wattle & Daub Contractors, Bellvue, Colo.
 Photo courtesy of Wattle & Daub Contractors, Bellvue, Colo.


Through careful observation and long-term performance research and analysis, my company has developed a way to successfully re-cover leaking, ballasted EPDM roof systems using spray polyurethane foam (SPF) and effectively double a roof system's life expectancy.
Photos courtesy of Wattle & Daub Contractors, Bellvue, Colo.
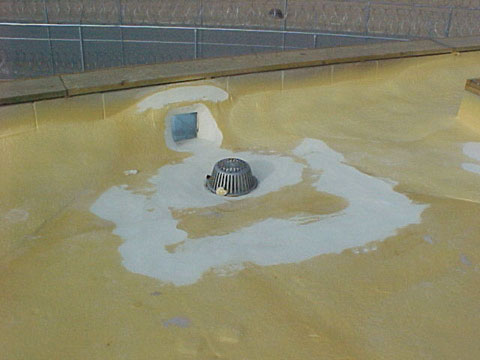
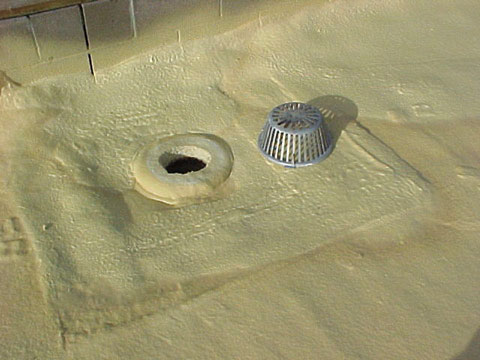
Photos 1 and 2: Wattle & Daub Contractors has developed a way to re-cover failing EPDM systems with SPF.
The SPF re-covery system outlined in this article is an optimal retrofit solution for buildings with low-slope structural decks. Such buildings usually have drainage slopes built using tapered insulation with roof systems installed on the topside of the tapered insulation. If an entire roof system is removed to the structural deck, the building owner loses not only insulation, but also the roof slope. This offsets the initial savings of using a ballasted system. Our method offers a viable, economical option for building owners.
A common failure
In our experience, stretching, caused by shrinkage, is a primary failure indicator for EPDM roof systems. This failure usually is discovered when a building leaks and a roof system inspection shows the membrane is pulling away from inside corners and angle changes. Our clients who have buildings with ballasted EPDM roof systems frequently report leaks after five years to seven years with roof system replacement required within the first 10 years to 12 years of service.
The timing and amount of shrinkage-related damage usually depends on how complex a roof system is because problems typically occur at membrane angle changes. A high proportion of equipment penetrations, penthouses, monitors and skylights increases the probability of leaks. Mechanical curbs seem to present fewer problems, but parapet walls and changes in roof elevation can exaggerate shrinkage.
The re-covery procedure
The installation procedure my company performs has been developed through many years of careful observation and a continuous improvement process. It also has been documented by third-party long-term performance research through Phoenix-based Arizona State University's Del E. Webb School of Construction. However, it is not the sole method to re-cover a failed single-ply roof system.
The step-by-step procedure that follows outlines our installation process for a typical project.
Each project should be reviewed on a case-by-case basis, but provided an old membrane is removed and replaced with a re-cover board, this installation process should apply to most nonballasted roof systems.
Step 1: Remove the rocks
Our first step is to remove ballast. We use vacuum and/or hand removal. Both have proved to be effective and quick, and we decide which to use based on the specific project.
Depending on a building's construction and factoring in the risk of blow-off, we may install temporary ballast or choose not to remove all the ballast at once. Again, this is a decision we make based on the specific project.
Step 2: Roll it up
Once ballast is removed, we select one drainage plane and start at the low point or drain. We cut the membrane on three sides—parallel with the ridge at the foot of the slope—so it resembles a flap hanging down. Leaving it attached at the ridge but cutting the edges and bottom, we roll it back up the slope (similar to rolling a window shade) to the ridge and temporarily secure the roll by blocking it with sandbags.
If the weather changes rapidly and a building must be sealed in, we are able to unroll the roll from the ridge and spray the cut edges with SPF to seal it quickly. This only takes a few minutes, and we've found it reduces the risk of water entering a building.
At this point in the retrofit process, we like to conduct a thorough inspection of the roof deck and insulation. One of the benefits of removing EPDM membranes is it allows us to take a good look at what is underneath them.
Step 3: Board installation
Once the membrane is rolled out of the way and soundness of the underlying components is assured, we install a 1/2-inch- (13-mm-) thick asphalt-impregnated wood fiberboard (4- by 8-foot [1- by 2-m] sheet of a six-sided coated Class B board, which sometimes is called Structo-Deck) directly on top of the existing tapered insulation board. It is imperative to use a coated six-sided board because a coated one-sided material is much less moisture-resistant.
The fiberboard is fastened using the appropriate FM Global fastening pattern (about one fastener every 2 square feet [0.2 m²]) with FM-approved screws and metal plates. SPF does not adhere well to some plastics, such as polyethylene, so it is important to use metal plates. During this stage of the procedure, we construct a typical substrate similar to one that might be used for adhered EPDM. At this point, if a recovery board were used instead of wood fiberboard, the membrane would be glued directly to it.
At the end of each day's work, we make sure the new wood fiberboard is installed so it extends underneath the edge of the next day's membrane to facilitate night sealing. We also cut the old membrane loose and remove it from the roof.
Step 4: Start cutting
At all penetrations and perimeters, we install water cut-offs. When extruded polystyrene (EPS) is installed, it usually is tight to walls, nailers and mechanical penetrations. We cut it back 3 1/2 inches (89 mm) so there is a separation, or "trench," between the insulation assembly and penetration, parapet wall or curb.
These trenches extend to the structural deck. In Photo 3, note that as the slope is created with the tapered insulation, the depth of the trench will vary according to the insulation's depth. At some points, the trench can be 12 inches to 14 inches (305 mm to 356 mm) deep. At others, the trench only will be 2 inches (51 mm) deep. The trench should go all the way around the perimeter. Wherever there is a vent pipe or similar penetration, we cut around it so there is an 8- or 10-inch (203- or 254-mm) rectangle around that pipe.
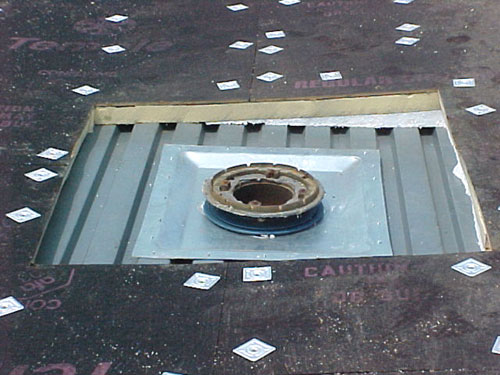
Photo courtesy of Wattle & Daub Contractors, Bellvue, Colo.
Photo 3: As the slope is created with the tapered insulation, the depth of the trench will vary according to the insulation's depth.
We remove all existing insulation to the steel deck at least 24 inches (610 mm) from the center of any drains. This provides an opportunity to closely examine the plumbing condition and allows the installation of a water cut-off in an area that commonly causes trouble with many retrofit roof assemblies.
Step 5: Fill the gaps
After the board is installed and trenches are ready, we fill all trenches and cavities with SPF. This process binds the system at all penetrations—the weak spots—and anchors it to the structural deck with SPF, which acts as a powerful adhesive, as well as the waterproofing cut-off device.
Step 6: Spray
Once the caulking process is complete, we spray foam over the entire field of the reconditioned roof assembly in a single 1 1/2-inch (38-mm) pass until it is complete.
Step 7: Detail those details
Before installing the coating, we detail the roof using handsaws, hand planes and, if needed, a mechanical scarfer. Around pipe penetrations, we cut and smooth the SPF to provide a level transition between vertical and horizontal plane surfaces. Sometimes, around drains, transitions can be a little untidy. We need to ensure there are no obstructions to the drainage by cutting off any lumps and bumps with a saw and planing them down to smooth them before applying the coating.
Step 8: Coating
Once the detailing process is complete, we coat the surface as we would any SPF roof system using 45 dry mils (0.045 of an inch [1.1 mm]) of a high-performance polyurethane top coat system and roofing granules in compliance with manufacturers' specifications.
Benefits
Using the procedure described, my company has installed systems that are performing similar to traditional SPF systems using the same materials, and they are giving every indication they will last 20 years or more with minimal maintenance. At this time, the oldest of our installed roof systems has performed for 17 years.
The roof system we offer is a premium, high-performance, all polyurethane system that is cost-competitive and offers all the benefits of SPF. A building owner can use his building's existing roof slope and insulation to avoid wasteful tear-off, as well as keep his building's existing R-value. When SPF's high R-value is factored into the equation, this solution also offers increased energy efficiency.
In addition, some of our customers take advantage of an additional environmental benefit realized by recycling ballast. Ballast is taken from the roof, transported to another site and used for landscaping. By salvaging most of an existing roof assembly, we're not dumping thousands of pounds of material into a landfill.
Lessons learned
We installed the first of these systems in 1983 and made some mistakes that resulted in leaks. As a result of our experiences with that initial installation, we've made two changes to the system.
The first change was to increase the minimum thickness of the SPF from 1 inch (25 mm) to 1 1/2 inches (38 mm) because 1 inch (25 mm) of SPF does not adequately bridge the softer, low-density EPS substrates under typical foot traffic.
The second change was to install the water cut-offs, or trenching, at all perimeters and penetrations to prevent water intrusion in the event of building or penetration movement. These changes satisfactorily addressed the problems we experienced.
During the years, as a business decision, we have bought only the highest-performing materials we could identify. For foam materials, the cost difference on a board-foot basis—particularly with SPF—between the best high-strength foam you can buy and softer, cheaper foams on the market is about 15 percent. This translates to about 10 cents per square foot. Because coating systems usually cost more than SPF and a high-quality foam that provides a smooth skin uses less coating to achieve minimum dry film thickness, the savings in coating costs more than offset the more expensive SPF material.
We sometimes are asked why we install a recovery board and don't apply SPF directly to tapered insulation. The reason is, compared with SPF, tapered, expanded EPS is a lower-tensile material with a lower cohesive strength. When SPF is sprayed directly to expanded EPS and the two materials thermally cycle, delamination may occur. Apparently, the thermal expansion coefficients of the two materials are not well-matched with their respective tensile strengths. This movement can cause blistering and delamination just above the interlaminar boundary in the EPS.
Similarly, it would not be advisable to apply SPF directly to existing EPDM because weathered EPDM is difficult to clean well enough to prevent "peel-off" during heavy winds. For this reason, it's important all existing EPDM flashings at parapet walls and curbs be removed to allow SPF application directly to the roof substrate, thereby achieving the best adhesion possible for a roof assembly.
A sound decision
Installing this technically advanced system requires an experienced SPF contractor who also is an accomplished roofing contractor.
The most important issue in this retrofit situation is to salvage reusable material to maintain slope and insulation value. The second most important issue is to use high-quality materials and good craftsmanship to ensure a successful installation.
We have spent many years developing this system, listening to customer feedback, making observations, building on past experiences, documenting long-term performance and making adjustments.
Every installation is a unique situation and an opportunity to learn and improve.
Thomas A. Tisthammer is president of NRCA member Wattle & Daub Contractors, Bellvue, Colo.
Requirements for doing it right
A contractor should:
A manufacturer should:


COMMENTS
Be the first to comment. Please log in to leave a comment.