
Copper, the first metal used by humans, has played a critical role as a roofing material for thousands of years. For example, copper roof shingles topped the 162-foot-tall, nine-story Loha Maha Paya temple built in Sri Lanka in the third century B.C. Centuries later, copper roofs were the standard of countless pieces of historic European architecture. Now, 10,000 years after copper was first discovered, roofing contractors are experiencing a renewed demand for the "green metal."
Copper is plentiful throughout the world, and despite its vulnerability to market price fluctuations, it is cost-efficient during its life span—in roofing applications it can last more than 100 years.
With use of architectural sheet copper in roofing and flashing applications on residential and commercial structures at an all-time high, a huge demand for skilled roofing contractors and installers now exists.
Lexington, Ky.-based Odessa Roofing, for example, has experienced this demand firsthand. According to the company's owner Ken Evans, "Odessa Roofing has experienced a dramatic increase in customer inquiries regarding installation of copper roofs and copper decorative accessories. Unfortunately, we've had to decline a majority of this business due to a lack of skilled copper tradesmen within our organization."
To help roofing contractors meet the growing demand for copper installation and repair, the Copper Development Association (CDA) offers basic information and hands-on training in the techniques used to install and repair copper roof systems.
Getting started
Before working on a copper roof system, it is important to have the proper tools, equipment and materials necessary for the job.
First, select the proper thickness and weight of copper sheet. Most copper roofing is constructed using 16- or 20-ounce cold-rolled copper sheets. Sheet copper is produced up to 48 inches wide, but 36-inch-wide sheet is most common. Continuous coils allow contractors with roll-forming equipment to make full-length panels.
Sheets can be preformed or field-formed into pans. Pans up to 10 feet long are considered short pans. Roof systems using pans longer than 10 feet, or long pans, should be designed to accommodate additional thermal movement. Copper pans typically rest on a minimum 4-pound rosin-sized building paper on top of No. 30 saturated roofing felt underlayment. Other materials may be substituted in specific applications. It is always wise to have the underlayment manufacturer verify the underlayment will perform properly at the temperatures experienced by the metal panels.
Elevated roof temperatures can cause the asphalt in a felt underlayment to bond metal roofing to the underlayment. This inhibits the copper roof system's movement and can result in premature fatigue and/or destruction of the felt paper. The rosin-sized building paper acts as a slip sheet to prevent such bonding.
In addition to basic installation equipment, such as mallets, tongs, snips and brakes, other tools are available to meet design demands and reduce installation time. These include roll-forming panel formers, mechanical seamers for standing- and batten-seam panels, power-curving machines, automatic brakes, and portable brake and gutter-forming machines. These tools provide a more uniform appearance and, in many cases, a more economical installation.
Two pieces of equipment significantly have affected copper roof system installation efficiency: the power pan former (or roll former) and power seamer. Power pan formers are used for forming pans or roof accessory shapes from flat sheet or coiled stock in lengths limited by specific project requirements. In some cases, transverse seams may be totally eliminated when full-length sheet or coiled stock is used. Roll-forming equipment is designed for standing- and batten-seam roof pan profiles. Available equipment can handle up to 20-ounce sheet or coil in 12- to 27-inch widths.
Power seamers are available for standing- and batten-seam roof systems. Power seamers allow for precise, uniform seams without hammer marks typical of hand-forming equipment. Seams can be accurately completed at a rate of 15 to 25 feet per minute—a fraction of the time required by manual seaming techniques.
Workers should inspect roof decks to make sure they are strong and stable enough for a copper installation. Be sure to comply with all local codes and guidelines for metal roof system installations.
Good trade practices
Before you begin an installation, it is important to ensure safe work site practices are maintained. Safety gear must be worn at all times. Sheet metal's edges are extremely sharp and should be handled with care.
Although all roofing work is potentially dangerous, copper, like other metals, presents an additional set of challenges. Unlike asphalt and other commonly used materials that are coarse and offer a level of traction, metal is extremely slippery. Work should never be done when rain, ice or snow is present.
Copper sheets and panels should be placed on a flat surface during installation so they cannot slide off a roof or be inadvertently bent or creased. Although copper is durable, it is also malleable and easily dented and scratched. Because of the nature of roofing work, it is nearly impossible to completely avoid scratches; however, with proper planning you can limit marks on a finished project. In many cases, a piece of building paper, thin plywood or sheet metal can prevent scratches on copper roofing and flashing from tongs and wayward hammer blows. Because copper has a naturally weathering surface, fingerprints and incidental scratches usually are difficult to identify after a year of exposure.
The installation
Before copper installation, a roof deck should be thoroughly dry, smooth and free from projecting screws, nail heads or other imperfections. The entire deck surface should be covered with an approved underlayment secured with copper nails. The underlayment, often saturated roofing felt, acts as a cushion and provides temporary weather protection for the roof deck.
The next step is placement of underlayment. A synthetic underlayment, self-adhering underlayment or traditional SBS-polymer-modified bitumen base sheet can be used. Consult specific product manufacturer recommendations when selecting an alternative underlayment. Underlayment should be installed using copper or hardware-bronze roofing nails with 0.109-inch minimum diameters and 7/8-inch minimum lengths, barbed with large heads.
In most cases, eave, valley, gable and some other types of flashing will need to be installed before the roof panels. Hips, ridges, head-walls and counterflashings are handled later because they must shed water over the roof panels.
Standing seam
Standing-seam roof systems are composed of preformed or field-formed pans, usually with about 18- to 24-inch-wide seam spacing. CDA's recommended dimensions are specified in Figure 1. Such pans run parallel to a roof's slope and are joined to adjacent pans with double-lock standing seams. Panels up to 10 feet long are securely attached with concealed fixed copper cleats typically spaced 12 inches on center.
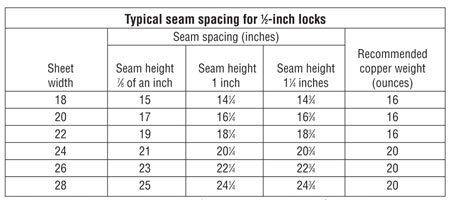
Figure 1: The Copper Development Association's recommended dimensions for standing-seam copper roof systems
Transverse seams connect the upper and lower ends of panels where relief from thermally induced movement is necessary. These seams should be staggered for adjacent pans to avoid excessive copper thickness at the standing seam.
Field forming involves the use of copper in flat sheets or coils formed into pans by power pan formers. Rafter-length pans are possible, theoretically eliminating the need for transverse seams. However, in practice, columnar strength of the formed 1-inch-high double-lock standing-seam panel limits length to 45 feet. Regardless, eave and ridge details must allow for copper expansion and contraction.
When working on a gable rake, roofing workers should lap adjacent lengths of rake strips at least 3 inches in the direction of water flow. At a standing-seam ridge or hip, opposing panel standing seams may need to be staggered to avoid excessive copper thickness, depending on the ridge or hip details.
Batten seam
Batten-seam roof systems consist of copper pans—separated by wood battens—running parallel to the roof slope. The battens are covered with copper caps that are loose-locked into adjacent pans. The widths of these preformed or field-formed pans may vary. The recommended maximum width depends on the copper's thickness. (See Figure 2.)
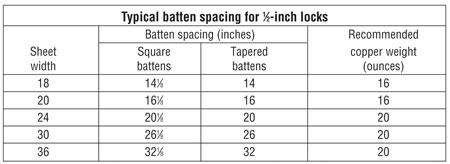
Figure 2: The Copper Development Association's recommended dimensions for batten-seam copper roof systems, assuming 1 1/2-inch-high battens
The battens, which can have a wide variety of shapes and sizes, not only provide a means of securing the copper roof system but also allow a wide variety of aesthetic options. Transverse seams are required to join the ends of batten-seam pans.
There are two methods for accommodating expansion movement between pans. Both rely on a 1/16-inch space between the upstanding legs of a pan and batten. Both use battens that are commonly cut from 2- by 2-inch stock. The technique may be adapted to battens of other sizes. With the preferred method, battens are tapered so their bases are 1/16 of an inch narrower on each side than at the top. The pan's upstanding leg is then formed vertically.
The alternative method uses square battens. The pans are formed 1/16 of an inch narrower on each side with their upstanding legs bent at an angle greater than 90 degrees to meet the batten cap. Batten caps are joined at their ends with 1/2-inch locks or lapped at least 3 inches in the direction of water flow. Batten caps should be formed of the same thickness of copper as the underlying pan.
Flat-lock seam
Soldered flat-lock seam roof systems typically are used on low-slope roofs. Unsoldered, flat-seam panels are used on steep-slope roofs and walls. They are also used on curved surfaces, such as domes and barrel vaults. Flat-lock seam roof systems typically are constructed of 18- by 24-inch, 20-ounce, rectangular cold-rolled copper sheets. Two adjacent sides of the sheets are folded over and two are folded under to form 3/4-inch locks. Sixteen- or 20-ounce cold-rolled copper cleats are installed in each of the longitudinal and transverse seams. The finished pans are interlocked longitudinally and transversely with staggered transverse seams.
Where slopes are 3-in-12 (14 degrees) or less, seams are soldered. Before folding a sheet's edges, the sheet must be cleaned, wire brushed, fluxed and pre-tinned on both sides to a 1 1/2-inch width. After the locked seams are engaged, they should be malleted or dressed down, fluxed and thoroughly sweated full with solder. The soldering coppers should weigh at least 5 pounds per pair. Many experienced contractors prefer much heavier—up to 10 pounds per pair—coppers. If a torch-heated soldering copper is used, the soldering copper's head should weigh at least 3 pounds.
To accommodate expansion, roofs should be divided by expansion battens. These tapered battens should be spaced no more than 30 feet apart in any direction. They should be covered with 20-ounce copper caps in 8- to 10-foot lengths, which must be locked and soldered together.
Horizontal seam
Horizontal-seam roof systems consist of copper pans—whose long dimensions run horizontally across a roof—attached to horizontal wood nailers. A step is used at each nailer to allow adjacent pans to lock effectively. The height and spacing of the steps may vary, or additional steps may be included between locks to achieve different appearances.
The copper pans may be supported by rigid insulation, inserted between nailers or supported by wood sheathing applied over the nailers. Figure 3 shows the recommended dimensions for copper pans based on their widths.
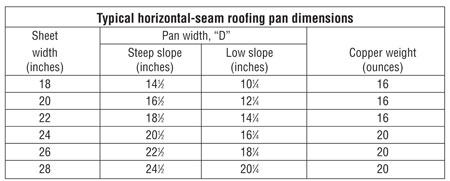
Figure 3: The Copper Development Association's recommended dimensions for copper pans in horizontal-seam copper roof systems, assuming a step height of 1 1/2 inches
Expansion in the vertical (transverse) direction is accommodated by the steps and locks between pans. In the horizontal (longitudinal) direction, expansion joints or special vertical battens are required every 30 to 40 feet. Expansion seams must be staggered on adjacent pans to avoid excessive copper thickness at the locks.
Wind-uplift resistance
The durability of properly designed and installed copper roof systems is proved by the most important test—real-world performance in severe weather conditions, including hurricane conditions. CDA has conducted extensive wind-uplift testing using UL 580, "Standard for Tests for Uplift Resistance of Roof Assemblies." Both systems tested—1-inch-high double-lock standing seam and flat-locked and soldered—exceeded the Class 90 standard. Test results and construction details are published in CDA's Copper in Architecture Handbook. NRCA also has a UL listing, No. 575, in Underwriters Laboratories Inc.'s Roofing Materials & Systems Directory.
A unique metal
Working with copper can be a uniquely satisfying experience. It's easy to work with and lends itself well to clad simple and complicated roof surfaces. Its self-protecting patina distinguishes many of the finest buildings in the world. With proper application of basic techniques and skills, roofing contractors can be confident they are providing an outstanding value when they install a copper roof system.
Larry Peters is southern regional manager for the Copper Development Association.