Author’s note: Bryan Light, technical services manager for The Brick Industry Association, contributed to this article.
When a call comes into Don Kennedy Roofing Co. Inc., Nashville, Tenn., that a leak has been reported from a chimney, everyone’s ears perk up. After years in the business, we know there are a handful of details that require special attention. The phrases “persistent leak,” “multiple contractors” and “several repairs” all raise alarm bells. They trigger a series of decisions that typically escalate to investigative services with testing and reporting.
One of the most common problems is persistent leaking from brick chimneys, primarily those with brick veneer. Building age often is irrelevant. In fact, there usually is nothing wrong with the brick masonry. The problems have everything to do with design, intended use, and the sequence and/or skill of installation.
Common chimney failure points
In my experience, the common areas where chimneys fail are:
 Chimneys before and after repairs
- Roofing
- Underlayment (particularly felt)
- Base flashings (step flashings installed under shingles and over felt rather than a solid apron or larger step flashing with proper counterflashing)
- Counterflashing (skirt or saw cut rather than two-piece counterflashing)
- Sheathing/exterior materials (brick veneer, stone veneer, solid masonry, siding, exterior insulation and finish system, etc.)
- Chimney cap
- Penetrations (vent stacks, flues, etc.)
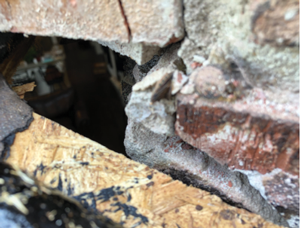 Deteriorated chimney
Brick is especially tricky because the average person will assume brick is impenetrable, but it is not. Brick and mortar construction, like any building material, is subject to a whole set of conditions to be met for proper installation, namely: water runs downhill; building materials are absorptive; and impediments to these principles should redirect and not halt water movement.
The following two case studies compare and contrast common brick chimney failures Don Kennedy Roofing has faced and how we addressed them.
Coated or painted chimneys
By the time I got involved in this particular project, the customer was already fed up. The copper flashing and valley metal had been replaced, and the customer was instructed to reseal both of their existing chimneys to prevent further leaks. However, as this was not a service offered by my company at the time, the homeowner chose to have a trusted interior painter coat the chimneys using the product my company had recommended. It was the right product and recommendation but a wrong application by a painter inexperienced with exterior painting. The issue with this approach is simply coating a chimney doesn’t solve the problem.
The most important part of applying any coating is the larger voids must be filled with either a filler or Permathane.® For voids greater than 1/8 of an inch, there has to be ample opportunity for adhesion to all sides of the void in question, requiring the use of a backer rod and Permathane. In this case, when the painter coated the brick, he did not account for the voids and simply rolled two coats over them. The brick appeared coated; however, if voids are left open and/or moisture is present in the chimney mortar, the coating will fail and moisture will escape and create new voids in the applied coating.
To demonstrate this to the customer, we used a RILEM tube and documented the rate of absorption with water applied directly to a void, which recreated immediate leaks in the exact locations on both chimneys. We then scoured the chimneys and applied Permathane to all voids followed by two rolled coats of commercial-grade coating and conducted a water test to confirm the seal. I’ve followed up multiple times with the customer, and the chimneys remain leak-free.
As an aside, I also notified the customer that not only were the chimneys in need of proper through-wall flashing but the chimneys also posed a significant risk. The weight of the brick was not properly supported by the roof deck, and triple-header construction was needed surrounding the chimney. The attic space was large and well-maintained and the home was of significantly higher value than most, which begs the question: Shouldn’t that price point buy a better-quality home? My experience is often the opposite. Some of the worst construction errors I find are in the most expensive homes, and no chimney is safe.
The leak that wouldn't end
In this case, we were contacted by a property management company acting on behalf of a homeowners association board to correct an issue that had persisted for more than a decade. Assisting a forensic architect, we were tasked with solving a problem no one else could.
The complex had 50 units, and each one had a chimney. Several were actively leaking, but because of suspected design flaws, it was clear all would need correction. To pinpoint the problem, we took one chimney and demolished it to the roof deck with the intent to rebuild it using lighter materials and the existing framing behind the veneer. All bad wood was removed and replaced, and the final details incorporated through-wall flashing and multiple layers of redundant waterproofing.
During the demolition, it quickly became evident so much coating had been used to “seal” the chimney that we could remove five or six bricks at a time using little more than a 2 1/2-pound hammer and masonry chisel. The flashing and counterflashing at the chimney’s base were purely decorative and none of it had been soldered. The deck beneath the base flashing was rotted as were parts of the framing members.
The deck also showed that at some point, the original deck was not under the brick that had previously supported the chimney’s weight. Rather, the deck abutted the brick, allowing the chimney’s weight to float above the homeowner’s living room and pose a significant risk.
The chimney cap was another problem. Although the previous contractor had opted for welded stainless-steel chimney caps, they were installed over exhaust vent penetrations and sealed with caulk. In addition, the caps had been installed by screwing through the tops of the cap with masonry screws into wood framing and the screw heads had been caulked with clear commercial sealant, providing yet another maintenance item with the potential for future moisture intrusion.
The final design and corrective action was the result of careful consideration; thorough presentation to the board; and safe, highly managed execution, documenting every step of the process. We reduced the weight and risk of the existing design by demolishing the veneer chimney, resheathing and reinforcing the framing, and installing sequential through-wall flashing with DensGlass® and an exterior insulation and finish system. A final water test was performed to verify the installation’s success.
How to hunt for a leak
When I receive a request for a chimney inspection, I immediately ask a series of questions:
- What is the project’s service history?
- What are the contract documents involved?
- Are as-built plans available, and what was the intended use in original design?
- What is the consistency of the leak, and where is it?
- What is access like, and can the area be tested?
- What testing methods are best suited to the situation?
- Who has the most intimate knowledge of the service history?
After I ask these questions, I do a preliminary walkthrough of the site and inspect known conditions before continuing testing. If the preceding information is thorough, I may schedule testing without a walkthrough.
The testing methods used to evaluate moisture intrusion are beyond the scope of this article and are even more difficult to explain to a client. But they typically are a combination of the following:
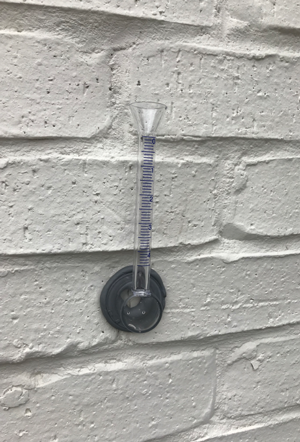 RILEM tube used to document rate of absorption
- RILEM tube testing
- Water testing
- Infrared testing
- Research
- Moisture readings
- Destructive testing/material removal
There are a lot of opinions and resources about destructive versus nondestructive testing methods and their validity, which I encourage you to explore at your leisure. However, I believe inspecting, testing, repairing and retesting with extensive documentation throughout the entire process is sufficient.
What is most important is a thorough report at the end of the project for the client in a usable format. I tailor this approach to the client whether it’s writing reports or compiling videos, PowerPoint presentations and external articles detailing similar issues.
Learn to succeed
I have seen people quit their jobs over impossible leaks because the anxiety of failure was a burden too great to bear. It’s been referred to as imposter syndrome … the notion you are not qualified for the role you’re in and if anyone finds out you’ll be ridiculed and labeled a fraud.
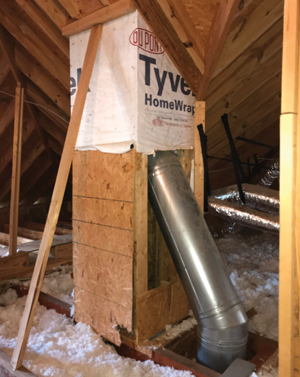 An example of improper chimney support
The reality is we come across issues we’re uncertain of or unfamiliar with all the time in building science and construction. The challenge is to adapt and overcome adversity by educating yourself with the best obtainable version of true and accurate information. If you don’t know why something is failing, inspect it, test it, attempt a repair and retest. The worst thing you can do is assume you know the answer, misdiagnose a problem and hide from your clients when things go wrong.
The point I’ve set out to make is there are things we know in construction and things that we haven’t yet realized. History has proved certain designs don’t last and others do. Therefore, when conditions arise, we know how to address them with immediate effect. You owe it to your clients to present every option to them and let them make decisions. But if you don’t educate them about what those options are or you don’t know what options exist, you are simply experimenting with your clients’ money.
Nick Warndorf is director of consulting services for Don Kennedy Roofing Co. Inc., Nashville, Tenn.